Installing the License Server
1. Select a PC running a 64bit OS. It can be either Linux (preferred) or Windows. This server should be on-line during operation hours and should have a static IP or have a name the clients can resolve using DNS. It is recommended that the server will be on the same LAN as the clients to avoid IP translation. Make sure there are no firewalls that might be blocking the communication between the server and the clients. We recommend the server to have at least 4G RAM.
2. In the package you received from us you will find a user manual. Please follow the installation instructions that are detailed in this manual.
Installing SoliCall Pro on Agent’s PCs
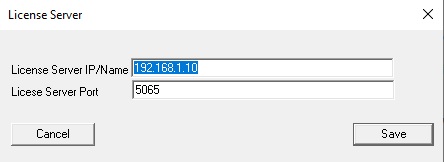
On each agent PC, install SoliCall Pro. Initially when you open the screen of SoliCall Pro, you will see the error message “Invalid License Server”. To resolve this error, go to “Tools->License Server” and enter the IP (or Name) of the license server:

Now, this error message will disappear. In addition, in the CLI of the license server you should be able to see the actual usage count:

SoliCall Pro starts with the a built-in evaluation period. If you received a license for SoliCall Pro, you can install it on each instance of SoliCall Pro. This is done via “Tools->Enter License…”
The next step is to avoid Windows from blocking SoliCall Pro from communicating with other instances of SoliCall Pro and with the PBXMate server. This is done by opening a command line as administrator and typing:
netsh advfirewall firewall add rule name=”SoliCall” dir=in action=allow program=”C:\Program Files (x86)\SoliCall\bin\SoliCall_Pro.exe” enable=yes
Installing PBXMate
Follow the manual in the PBXMate package you received from us. Please note that if you are installing PBXMate on the same machine on which you installed the “license server” then the installation directory for PBXMate should be the same as the one you used for the license server.
Configuring PBXMate on each PC
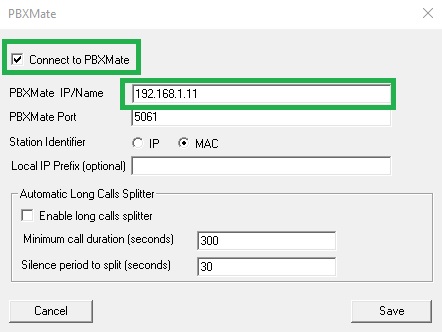
On each installation of SoliCall Pro, go to “Tools->PBXMate”, check “Connect to PBXMate” and update the IP (or Name) of PBXMate server.

Notes:
1. If the agent’s PC has more than one IP and you want SoliCall Pro to connect to PBXMate using a specific IP, you can specify the Local IP or its prefix (e.g. 192.168).
2. If PBXMate is on external network and the PCs are behind NAT, edit PBXMate configuration file and set:
UpdateRTCPIPPortFromIncomingRTCPIPPort=1
3. If your softphone is not releasing the microphone after each call but rather keeps the microphone constantly open, the result is that SoliCall Pro will treat the entire duration as one single long call. In this case, in PBXMate statistics you will see very long calls (instead of many short calls). This behavior will result in lower quality of noise reduction, therefore in such case we recommend to enable automatic splitting of long calls. Enabling this feature will have no impact on any of your existing system functionality (e.g. actual call, call recording, call monitoring statistics etc.). The automatic splitting is using voice activity detection that is part of the noise reduction filtering, so make sure you do not disable the noise-reduction filtering in the option menu.
Monitoring the usage & statistics
Using the web browser you can view few graphs/statistics that are generated by PBXMate. You can look at:
Live calls

Note: if in the live statistics you see call duration not exceeding 30 seconds although the calls are actually longer – this means there is a firewall blocking the communication from PBXMate to SoliCall Pro client.
Noise Map

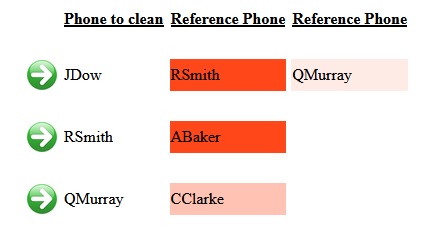
For example, the first line in this Noise-Map indicates that for agent JDow there are two other agents disturbing him/her: RSmith and QMurray. The background color indicates the level of disturbance: the darker the color, the bigger the disturbance is.
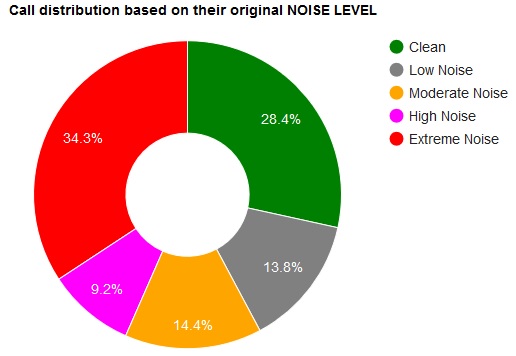
Accumulated statistics

Connected PCs
Under the “log” sub-directory, you can find the file “licenseserver_active_pcs” which contains information on all PCs that have connected to the license server in the last 24 hours:

Usage Report
SoliCall can monitor the usage of agents and/or desktops per day.

Testing the Audio Quality
In addition to listening to the audio “after” filtering, you can also compare the audio “before” and “after”. In order to do so, you will need to activate recording in SoliCall Pro, both the regular recording and also the “extended recording” (via “Tools->Advanced Options…”). Once you do so, SoliCall Pro will start recording the calls. Contact us to get a utility (“parse_recording_dir”) that will generate from the recorded data audio files of “before” and “after”.


