Selecting the desired audio filtering
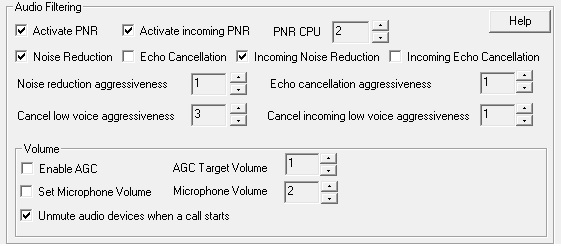
• PNR – Generic profiled based noise cancellation with an AI engine. You can enable/disable it for outgoing/incoming audio. Increasing “PNR CPU” allows PNR to consume more CPU and improve noise cancellation.
• Noise Reduction – Remove ambient noise on your side so your party can hear better.
• Echo Cancellation – Cancel echo on your side so your party will not hear himself/herself. If you are not using headset you should enable this filter.
• Incoming Noise Reduction – Remove ambient noise coming from the far-end so you can hear better.
• Incoming Echo Cancellation – Cancel echo coming from the far-end so you will not hear yourself.
• You can increase/decrease the aggressiveness of noise cancellation and echo cancellation using the matching spinners.
• The “Cancel low voice aggressiveness” and “Cancel incoming low voice aggressiveness” spinners controls the aggressive level of canceling low volume human voices (a.k.a “voice cancellation”). For more information take a look at the following page describing how to cancel human voice.
• “Enable AGC” and “AGC Target Volume”. These two controls can be used to make sure volume level (of both sides) will be aligned with the target volume level. Enable this feature if either you or your party find it hard to hear each other. Increasing the value in the spinner will increase the target volume level.
• “Set Microphone Volume” and “Microphone Volume”. These two controls can be used to decide on the volume change that Windows will do to the output of SoliCall’s Microphone before providing it as a microphone input to the softphone. Enable this feature if the input microphone audio to the softphone is loud and saturated. Reducing the value of the spinner will reduce the volume level.
• “Unmute audio devices when a call starts” will cause SoliCall to unmute the microphone/speaker when a call is initiated. If you want to manually control the mute/unmute of your audio devices then uncheck this option.